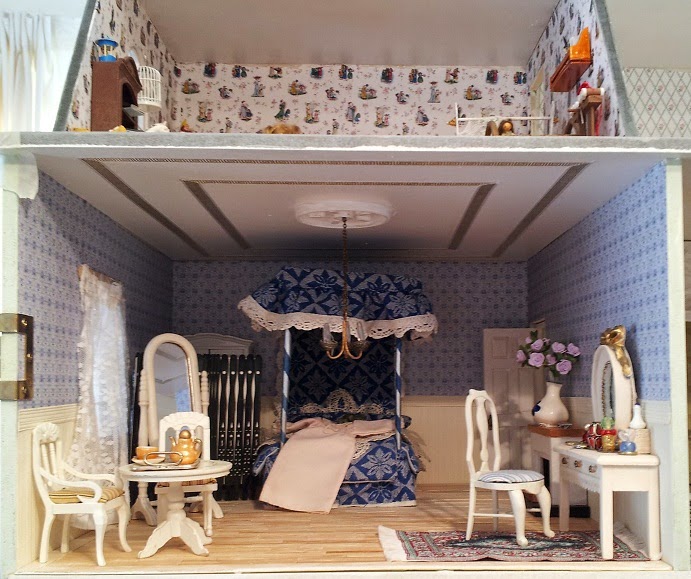
I wanted to make a cabinet to match the nursery bed, and I decided to combine a hutch cabinet and an open cabinet top.
I have made the hutch cabinet twice: one is in a rear corridor, the other as a base for a kitchen cabinet.
I have made two closed cabinet tops, but it seems that the open top is less common. Now I have one.
I will not show step-by-step pictures. The top cabinet was probably the easiest Chippendale piece I have made, and I have now made more than thirty.
I painted the outside with the same paint as the bed, a plain acrylic from a kids' paint set. The inside I painted with the remains of paint from the wardrobe. It is not plain white and I think it goes well with blue.
The base proved easy too, because this was the third time, and I almost didn't have to check the instructions. Not even the hinges were evil this time - both sides went in at first attempt.
For handles, I used small silver beads. I left both the inside of the main cabinet and the drawer unpainted.
As I tried to put some objects on the shelves I realised that the shelves were much smaller than my original nursery shelf made from Jenga blocks ten years ago. Even then I remember that some toys were too big.
So now most of the toys will have to lie scattered on the floor. As they do in nurseries.
Showing posts with label nursery. Show all posts
Wednesday, 22 June 2016
Nursery cabinet
Labels:
18th century,
cabinet,
Chippendale,
House of Miniatures,
kit,
miniature,
nursery,
x-acto
Monday, 6 June 2016
A Chippendale bed
As I reported in the previous post I have been buying more Chippendale kits, but I still have many from previous bargains that I haven't made. There is no system in my cabinet-making: I pick up a kit, look at it, think a bit, often put it aside, either because it feels too complicated or because I don't know exactly where it might go.
I have two bed kits, and I decided that the single bed should be in the nursery, to replace a rather clumsy bed of unknown origin that has been there for a while.
This is a straightforward kit that just needs a lot of patience. Since I had made the canopy bed I knew what was coming.
But I am much more skilled now than I was three years ago. I am better at aligning, I am better at drilling tiny holes (with a pushpin), at holding the assembly together. What I did wrong here was that I painted the parts before assembly, not thinking that the inside wouldn't have been painted, but there isn't much I can do about it, and nobody will ever see.
Stringing was fun:
Then I made the mattress of the same towel fabric as for the canopy bed, and used handkerchiefs for bedding, but I wanted a patchwork quilt for this bed. I have made miniature patchwork, and it's a hard job. It so happened that I went to a craft shop to get some more Really Useful Boxes to organise my supplies, and there I found just what I needed.
Of course as soon as I put the bed into the nursery I had to remove several items that were not in scale. You couldn't tell with the old bed, but now it was obvious. Fortunately, I know exactly what Chippendale pieces I will put there instead. But so far there is complete chaos. As nurseries usually are.
I have two bed kits, and I decided that the single bed should be in the nursery, to replace a rather clumsy bed of unknown origin that has been there for a while.
This is a straightforward kit that just needs a lot of patience. Since I had made the canopy bed I knew what was coming.
But I am much more skilled now than I was three years ago. I am better at aligning, I am better at drilling tiny holes (with a pushpin), at holding the assembly together. What I did wrong here was that I painted the parts before assembly, not thinking that the inside wouldn't have been painted, but there isn't much I can do about it, and nobody will ever see.
Stringing was fun:
Then I made the mattress of the same towel fabric as for the canopy bed, and used handkerchiefs for bedding, but I wanted a patchwork quilt for this bed. I have made miniature patchwork, and it's a hard job. It so happened that I went to a craft shop to get some more Really Useful Boxes to organise my supplies, and there I found just what I needed.
Of course as soon as I put the bed into the nursery I had to remove several items that were not in scale. You couldn't tell with the old bed, but now it was obvious. Fortunately, I know exactly what Chippendale pieces I will put there instead. But so far there is complete chaos. As nurseries usually are.
Labels:
18th century,
bed,
bedding,
Chippendale,
furniture,
House of Miniatures,
kit,
miniature,
nursery,
x-acto
Saturday, 6 February 2016
Adam ceiling: nursery and servants' room
I haven't been completely idle, miniature-wise, all this time, but I have been making more Chippendale furniture, and I will show it later. Meanwhile, I have made two more Adam ceilings. If you haven't seen my Adam ceilings, have a look at dining room, the gentlemen's smoking room, the drawing room, the grand hall, the upper hall, corridor and guest bedroom.
I will not show all steps because I have shown them before, but as a reminder: I had to tear down the existing mouldings - luckily, they are paper - measure the ceiling paper, glue it on and then add new mouldings. There was not much challenge in the two attic rooms because they have plain, rectangular ceilings. Here is the nursery:

And here is the servants' room:

It's unlikely that the master would have Adam ceilings in such insignificant rooms, but let's pretend he really likes to show off, in case a guest might wish to visit.
Now all ceilings are done. It has been a lot of work, but surely worth it.
I will not show all steps because I have shown them before, but as a reminder: I had to tear down the existing mouldings - luckily, they are paper - measure the ceiling paper, glue it on and then add new mouldings. There was not much challenge in the two attic rooms because they have plain, rectangular ceilings. Here is the nursery:

And here is the servants' room:

It's unlikely that the master would have Adam ceilings in such insignificant rooms, but let's pretend he really likes to show off, in case a guest might wish to visit.
Now all ceilings are done. It has been a lot of work, but surely worth it.
Labels:
18th century,
ceiling,
nursery,
Robert Adam,
servants' room
Saturday, 26 September 2015
Attic finished (almost)
I promised not to show every step in my finishing touches, but now I have added mouldings to all the three rooms in the attic and put most of the objects back. The three attic rooms are nursery, servant room and guest bedroom. I know that a guest room would most likely not be on the same floor as a nursery or still less a servant room, but it just couldn't be done otherwise.
Last time I showed the nursery was six months ago here. (Scroll down the post to see pictures). Here is the fninshed room:
You may think there isn't much difference, but there is. Firstly, the door is now properly fixed, which took hours (as doors do; they never fit the opening). The skirting and coving have been added. The former is proper wooden skirting boards, but the coving is made from my ubiquitous 1:1 wallpaper. It still took a lot of work. There is not much left to be done in this room. Fix the curtain, which at the moment is white-tacked. Possibly add some pictures, then just make and collect more toys. I also have twin boys who will live in this room when I have made clothes for them. Perhaps I will have a nanny.
The last time I showed the servant room was four months ago when I built the upper stairs. It involved inserting a door (grrrr!), but now all mouldings are in place.
This room is more or less finished, but I can of course add pictures, rugs, objects, maybe another servant asleep in bed (I removed the doll to take the picture because she obscured the details in the background).
The last time I showed the guest bedroom was six months ago, when I was still wallpapering the attic rooms. This is what it looks like now.
I made a new floor for this room. Well, not exactly new: I finished the floor that I tried and discarded for the grand entrance hall. Since the floors in the two other attic rooms are made from adhesive shelf-lining, a hardwood floor in the guest room looked too conspicuous, while the two other shelf-lining floors I had were too bright. This floor looks good in this room, and it is sufficiently far away from the entrance hall hardwood floor inspired by it. Only a very keen eye will spot the similarity.
There is some work remaining to be done in this room. For instance, the mantelpiece doesn't look right with the skirting, so I will need either to build a chimey breast or remove skirting and make it in two pieces on both sides of the mantelpiece. I also need to think about curtains.
The work remaining for the whole attic is paint skirting edges, likely grey to match the sloping edges. I am also considering adding dark roof beams - fake, again, made of full-size wallpaper - but they may be too distracting.
I have not decided whether I will have display lights in the attic or just add tea lights here and there when I come to that.
At the moment I am really pleased that the attic is as complete as a dollhouse project can be.
Last time I showed the nursery was six months ago here. (Scroll down the post to see pictures). Here is the fninshed room:
You may think there isn't much difference, but there is. Firstly, the door is now properly fixed, which took hours (as doors do; they never fit the opening). The skirting and coving have been added. The former is proper wooden skirting boards, but the coving is made from my ubiquitous 1:1 wallpaper. It still took a lot of work. There is not much left to be done in this room. Fix the curtain, which at the moment is white-tacked. Possibly add some pictures, then just make and collect more toys. I also have twin boys who will live in this room when I have made clothes for them. Perhaps I will have a nanny.
The last time I showed the servant room was four months ago when I built the upper stairs. It involved inserting a door (grrrr!), but now all mouldings are in place.
This room is more or less finished, but I can of course add pictures, rugs, objects, maybe another servant asleep in bed (I removed the doll to take the picture because she obscured the details in the background).
The last time I showed the guest bedroom was six months ago, when I was still wallpapering the attic rooms. This is what it looks like now.
I made a new floor for this room. Well, not exactly new: I finished the floor that I tried and discarded for the grand entrance hall. Since the floors in the two other attic rooms are made from adhesive shelf-lining, a hardwood floor in the guest room looked too conspicuous, while the two other shelf-lining floors I had were too bright. This floor looks good in this room, and it is sufficiently far away from the entrance hall hardwood floor inspired by it. Only a very keen eye will spot the similarity.
There is some work remaining to be done in this room. For instance, the mantelpiece doesn't look right with the skirting, so I will need either to build a chimey breast or remove skirting and make it in two pieces on both sides of the mantelpiece. I also need to think about curtains.
The work remaining for the whole attic is paint skirting edges, likely grey to match the sloping edges. I am also considering adding dark roof beams - fake, again, made of full-size wallpaper - but they may be too distracting.
I have not decided whether I will have display lights in the attic or just add tea lights here and there when I come to that.
At the moment I am really pleased that the attic is as complete as a dollhouse project can be.
Labels:
attic,
bedroom,
decoration,
dollhouse,
kit,
moulding,
nursery,
skirting,
Womble Hall
Sunday, 29 March 2015
Bedroom ceiling and top floor
The last ceiling I had to decorate before putting in the top floor was master bedroom. For the study, that is on the same floor, I decorated the ceiling with wrapping paper; the bathroom ceiling will be plain, and I have no idea what ceiling I will have in the front corridor, because I haven't even decided on the wallpaper yet. I don't know why I have problems with this corridor; I have tried a dozen wallpapers and don't like any of them. But I cannot wait forever, so for once I will have to decorate the ceiling afterwards.
For now, I needed to decorate the master bedroom ceiling, and I had various ideas so I went rummaging in my bag of trims and ribbons where I found just what I was looking for. In fact, if I had found it before I might have used it in one of the reception rooms. Too late. Here it is:
I considered adding another frame or diagonals, but this seemed right.
Now came the final moment of floor assembly. Sand, sand, sand, scratch, sand. Try. No way.
I finally gave up and asked ny husband for assistance, but we couldn't manage it together either. I also realised that the working height would be impossible so we took down the main house from the basement and put it on a coffee table. This didn't help with putting in the floor, but at least gave me some space around the %$&£*"!! structure. Isn't it ironic that the kit is cut with precision laser tool, and then I have to shave and sand the pieces to make them fit.
But it was all worth while to see the beautiful ceiling in its room. I used a plastic lid from a yoghurt jar for ceiling rose:
You may notice that the celing light is the same fish hook I had in the drawing room, but this is because I found a better light for the drawing room. Actually, the light I had in the old Victorian bedroom and planned to have in this one. But it turned out to fit much better in the drawing room.
I put some furniture and objects in the bedroom to test.
I am very pleased. On top of the room you can see the nursery where I also put some things:
Now you may ask why I bother putting in objects in rooms that aren't quite finished yet. I still need to fix mouldings and doors, paint edges, drill holes for working lights, and so on.
Firstly, it makes me happy to see something actually achieved. I don't mind removing it again, but right now I can admire what I have done during the weekend.
More important, though, it is only with objects inside that I can see some minor faults that need to be fixed, or, as I described above, that the lights I have planned fit better in another room, or that a slightly crooked piece of wallpaper will be hidden behind a bed and nobody will know.
For now, I needed to decorate the master bedroom ceiling, and I had various ideas so I went rummaging in my bag of trims and ribbons where I found just what I was looking for. In fact, if I had found it before I might have used it in one of the reception rooms. Too late. Here it is:
I considered adding another frame or diagonals, but this seemed right.
Now came the final moment of floor assembly. Sand, sand, sand, scratch, sand. Try. No way.
I finally gave up and asked ny husband for assistance, but we couldn't manage it together either. I also realised that the working height would be impossible so we took down the main house from the basement and put it on a coffee table. This didn't help with putting in the floor, but at least gave me some space around the %$&£*"!! structure. Isn't it ironic that the kit is cut with precision laser tool, and then I have to shave and sand the pieces to make them fit.
But it was all worth while to see the beautiful ceiling in its room. I used a plastic lid from a yoghurt jar for ceiling rose:
You may notice that the celing light is the same fish hook I had in the drawing room, but this is because I found a better light for the drawing room. Actually, the light I had in the old Victorian bedroom and planned to have in this one. But it turned out to fit much better in the drawing room.
I put some furniture and objects in the bedroom to test.

I am very pleased. On top of the room you can see the nursery where I also put some things:
Now you may ask why I bother putting in objects in rooms that aren't quite finished yet. I still need to fix mouldings and doors, paint edges, drill holes for working lights, and so on.
Firstly, it makes me happy to see something actually achieved. I don't mind removing it again, but right now I can admire what I have done during the weekend.
More important, though, it is only with objects inside that I can see some minor faults that need to be fixed, or, as I described above, that the lights I have planned fit better in another room, or that a slightly crooked piece of wallpaper will be hidden behind a bed and nobody will know.
Labels:
bedroom,
ceiling,
decoration,
dollhouse,
kit,
nursery,
planning,
Womble Hall
Saturday, 1 February 2014
Finding the right place
I have several times promised to show what I do with large lots or bundles that I occasionally find on ebay. Such as:
or:
or:
It's very impressive when you see lots like these, but what happens is that they disperse into various projects, and after a while you don't remember where they come from, and some of them get lost - not literally, but lost among many other small objects. (Sometimes I ask myself how many miniatures I have in my different houses and room boxes: Five thousand? Ten thousand?)
I got a sweet Christmas gift from my daughter:
I decided that I must take pictures of where these objects found their place. For instance, the tiny Chinese figurine and the sea shell went to the Victorian corridor and the decorative plate to the Victorian drawing room. (This is a good chance to display some details of the house).
I took this opportunity to rebuild the nursery that had become much too crowded to see the details. The new toys are foregrounded, and I am very proud of having made a Ludo board for the tiny dice.
To be continued.
Labels:
collecting,
dollhouse,
miniature,
nursery,
toys
Sunday, 8 December 2013
Helen Hall, part 4
For the previous instalments, see here.
The final room that needed redecoration was the attic, and I left the roof as it was, but because it is so dark I wanted something light for the floor. I had a bit of paper flooring from another project that I copied and patched together, but I don't think it matters because real floors are also made of small bits, and there are so many things in this room that you almost cannot see the floor anyway. I have moved everything from the nursery room box to the attic, and it feels just right.
Saturday, 6 October 2012
Nursery
I bought the lovely little cot at a flea market. I made the washbasin and jug in my pottery class, and the stand is made from champagne wire. The fireplace is also from a flea market, but I painted it with "stony" paint. Most of the toys are from flea markets or parts of large buys from ebay. Some are key rings. Some are Christmas decorations. I made the hobby horse from a chess knight. I made all the books, cutting covers from catalogues, only of books that I love. This is a room box I keep adding to all the time.
Saturday, 8 September 2012
Nursery
To do a nursery is fun because there is room for imagination, as Anne of Green Gables puts it. I had some things that fit into a nursery, but some other things I had to make or re-make.
The table and chairs are from an old doll house. The crib used to be plain wood, so I painted it white and decorated with bits of lacey plastic placemat (a material that has proved extremenly versatile). It also decorates the shelf, which I made very simply from two building blocks and wooden strips Most of the toys are mini Christmas decorations, but I made the boat on wheels. The teddy bear comes from a flea market.
For some reason I also wanted a bed. I think it was mainly to decorate it with lace. I used chopsticks for bedposts.
The table and chairs are from an old doll house. The crib used to be plain wood, so I painted it white and decorated with bits of lacey plastic placemat (a material that has proved extremenly versatile). It also decorates the shelf, which I made very simply from two building blocks and wooden strips Most of the toys are mini Christmas decorations, but I made the boat on wheels. The teddy bear comes from a flea market.
For some reason I also wanted a bed. I think it was mainly to decorate it with lace. I used chopsticks for bedposts.
Subscribe to:
Posts (Atom)